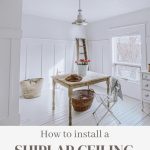
How to Install a Shiplap Ceiling
Do you want to cover outdated popcorn ceilings and do you love the look of shiplap? Use this tutorial to create a beautiful shiplap ceiling.
Yield: 1
Cost: 200 +
Equipment
- Mitre Saw
- Nail Gun
- Measuring Tape
- Pencil
- Ladder
- Stud Finder
- Chalk Line
Materials
- 5/16 - 1/4 ” Cottage Grade Pine Planking
- Liquid Nails
- Dap or Caulking
- Sandpaper
- Paint or Wood Stain
Instructions
- Before you begin, you will need to find your ceiling joists and which way they run, because you will be nailing the planks into those joints. Whichever way the joists run, you will nail your planks in the opposite direction, across the joists. You can find the joists by using a stud finder and marking them on the ceiling.
- Use a chalk line to mark the joints so that you know exactly where to place your nails. For us, it was much easier as the ceiling is lath and plaster which is extremely strong so we skipped the above steps.
- Place a plank and using the nail gun, secure it to the ceiling. You will want to start on one side of the room and work your way over. Make sure you are making adjustments as no room is completely square so you need to keep your boards tight together to prevent a slanted line at the end.
- The planks are tongue and groove, so simply connect them together and then add a nail every 12”’s or so.
- Stagger your planks as you install them. It is a more attractive look if you stagger the seams on each row by beginning every other row with a 4′ or some other different size board.
- Use Dap or caulking to hide any nail holes or imperfections along the seams of the walls.
- Stain or paint the planking before or after installation. I have done it both ways but prefer to paint the primer and first stain coat BEFORE installation and then finish with the final coat of stain AFTER when the panels are up.